Are you looking for a user review for the BoldGrid WordPress website builder tool? And you need step by step installation tutorial?
So, read the full article, we’ll review the software and show you screenshots and things to know before using to staring a website, a Blog or an eCommerce project online.
Are you looking to design your own website for your specific niche, but haven’t a clue where to even begin? Designing a website doesn’t have to be hard, in fact, it can even turn out to be quite a fun experience if you’ve got the right tools at hand.
Years ago, web designers and programmers held a monopoly in the website designing world, but these days, anybody can take part in the joy of creating their own site.
While there are currently a wide variety of different tools available to help you begin on your website designing journey, there is one true product that stands out amongst the rest.
Now you may be thinking to yourself, “What exactly is BoldGrid?”
Advanced website builder
BoldGrid is the latest creation built with WordPress in mind. The nifty website builder makes creating a visually stunning and highly favorable website as easy as dragging and dropping your layout into a true work of art.
There is no need to memorize long lines of code and the process will prove to be incredibly simplistic in nature. If you’re a DIY junky and love to take on a new project, then, BoldGrid is the product for you.
Unlike many of the biggest competitor website builders, this one was designed to work in tune with WordPress. With WordPress being the most powerful and sought out tool among web developers to create and manage websites on, having the plugin available makes getting the job made that much easier.
If you are already familiar with the WordPress platform, then great, your knowledge will give you a bit of a leg up during the process. However, if you’re a novice to WordPress, don’t worry, the tool was designed from the start with you in mind!

Building a website
So let’s begin with the simple steps that will get you started on your dream website.
To start, you will need to install BoldGrid. In order to do that, you need to get a hosting plan with the official host, InMotion. InMotion Hosting is currently one of the fastest, most reliable and supportive hosting products on the market.
The brand caters to business and corporate users, making it an excellent choice for a company-oriented website. Once you’ve chosen the package applicable to your needs, you can then install the plugin to as many WordPress sites as you’d like.
To install BoldGrid on an already existing WordPress installation, simply download the plugin, and then activate it through the use of your unique Connect Key. Once the plugin is successfully activated, you can finally begin the design process.
Related: Best Domain Name Registrars: Trusted Providers with Good Services
For first time users, BoldGrid’s ingenious design has turned the website designing process into 3 easy to follow steps.
1. Inspirations
The first step is the “Inspiration” phase. Begin by clicking on the light bulb icon labeled, “Inspirations”, in order to pick out and install the theme that you will be using.
Once there, you will see a wide variety of different business-specific categories to choose from. Each category will bring you to a theme selection area that has been pre-selected based on the niche.
The plugin itself comes with a huge selection of different designs and structures. Unlike other competitors, because of the plugin’s tie with WordPress, the amount of beautiful themes and designs to choose from is practically endless.
Once you have found the design of your choice, simply choose the one that’s right for you and then you will be forwarded to a large variety of starter websites.
Once one is selected, you will be prompted to a page set selection where you can customize the number of pages you’d like, depending on your industry. The theme will then begin to download and install itself. This process could take a few minutes.
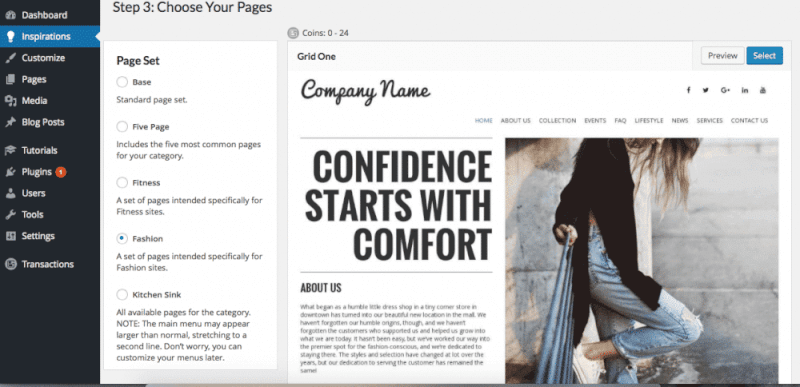
Once you have been greeted with the “Congratulations” message, it is finally time to get started on the second phase.
2. Customization
To begin, click on the paintbrush icon labeled as “Customize”. In the customize section you will be able to change specific details about your site. This can range from placing your business name on the header, to choosing different colors, menu options, content, and logos.
You will find yourself spending the most time in the “Customize” phase, so getting familiar with this section will prove to be useful in the long run.
All of the options here are very straightforward. Begin by adding your site title and logo. By clicking on the site title option, you will be given the chance to place in your site title and a possible tagline as well.
Determine where you’d like for it to be positioned as well as choosing from many different font styles and shading.
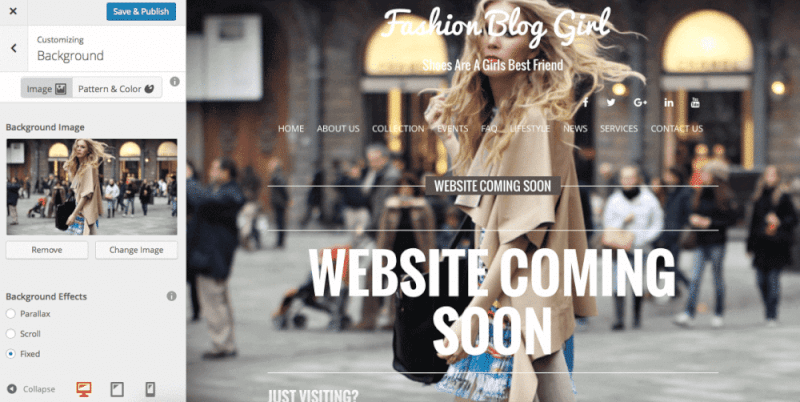
Then move onto custom color palettes. Play around with the background options by either adding in your own image or simply choosing a color or pattern that you deem fit.
The WordPress builder plugin comes with search features an API integration that is filled with tons of free stock photos that you can choose from if needed.

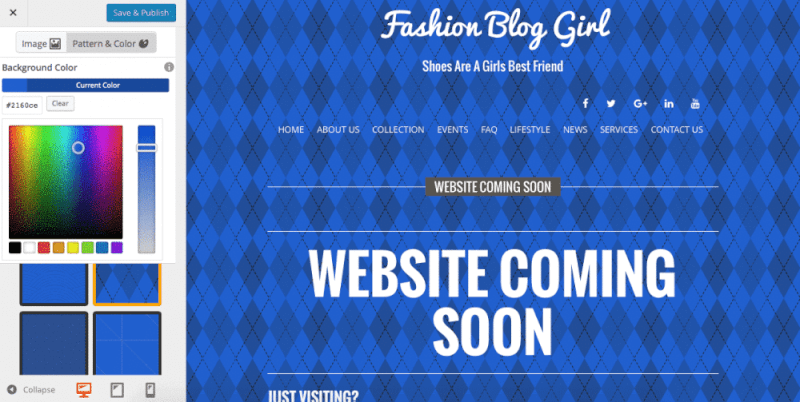
The pattern and color options are easily customizable as well. With the click of your mouse, change a dark gray background to a bold blue one with a checkered print, all at your disposal.
Customizing your menu options to fit the needs of your industry is your next best move. You could leave the menu options as provided or choose to add in more, take a few unnecessary ones out, and even reorder the entire selection.
Related: HostGator Review: Pros and Cons of Web Hosting Services
You may also easily create drop-down menus by reordering the menu options. Simply click on reorder and you will see a multitude of arrows visible.
Place your cursor on the menu options that you would like to create as a dropdown, and then choose to move the arrow to the right or the left. You will instantly see the menu option disappear from plain sight and instead, become a part of a new drop-down menu.
- Related reading: Website hosting services with templates
Once you’ve got that down packed, you can now move onto customizing the header with widgets. A widget is a small block that performs a specific function.
BoldGrid comes with a number of already prefilled widgets, such as a calendar or post archive, making it easy to choose one and place it on your site. You will see three set areas where you may place your widgets: Above Site Title, Below Site Title, or Footer Center.
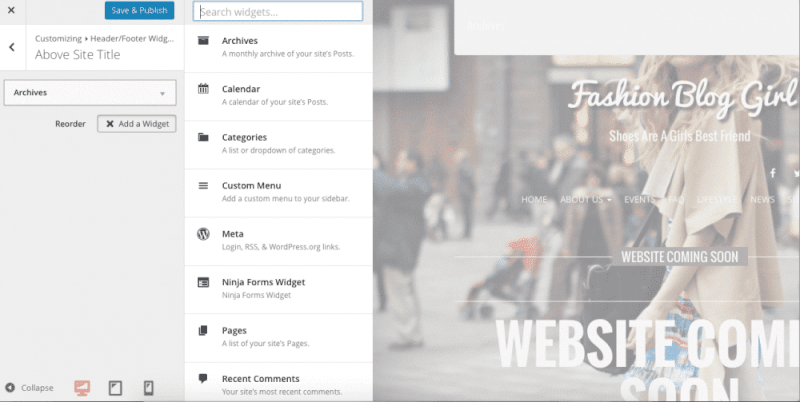
Clicking on either one of them gives you the option to add in a widget. A widget list will pop up, giving you a few top options to choose from. A search option is also available if there is a specific widget that you are looking to add.

3. Advanced settings
Finally, we have the advanced settings. In the advanced settings, you can modify the outlook of your page much more specifically.
The option between a static homepage, perfect for a business that is looking to get their information out there, or a homepage that is organized through your latest posts. The latest posts option is fantastic for users who plan on making consistent posts on their site.
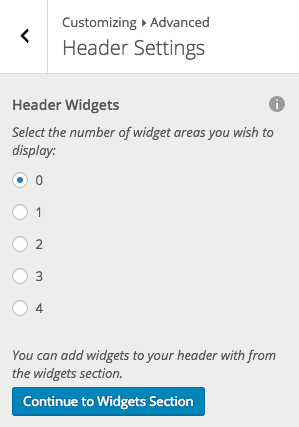
Decide how many widgets you’d like displayed on your homepage and play around with the footer settings all in one convenient section.
For more experienced website developers, the advanced section also includes an area where you can edit in custom CSS for the theme and/or a custom JavaScript.
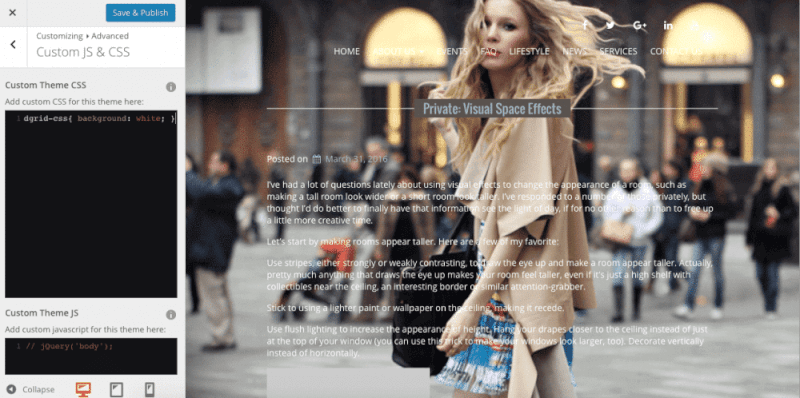
Now that you’ve gone through these steps, you can also take a look at how your site will appear on different devices.
On the bottom of the page, you will see three different icons, one representing a laptop, the other a tablet, and finally a mobile device. You may want to take the appearance of your site on these other devices into consideration before making any final design and layout decisions.
After going through all of these customizations, you are finally only one step away from completing your dream website. Click on the “Save” and “Publish” icon to save all of the changes that you have made and then, exit out of the customization phase.
At this point, you can begin to edit your pages and add your own unique content. Fill in your “About Us” section with all of the information necessary for your audience.
Related: Pressidium WordPress Hosting Review
Edit your “Contact Us” page and any other pages that will help shed light on your company and what your website stands for.
You can also begin to add blog posts and various different photos in the media section. All of these edits will help make your website stand out among the rest – especially if you happen to be involved in a competitive field.
Editing your page layouts is made even easier through the use of drag and drop. The layout of your website can be edited using the prebuilt “Gridblocks” that save you tons of time. You can even create new pages through the use of these Gridblocks.
After customizing your page and adding in so many business-specific edits, previewing your work will give you a better idea of the flow of the site.
To view your site, simply place your cursor over your website name in the toolbar. You can view your site through either the Active or Staging version.
Your staging site is visible to you only, perfect for when you are making tons of changes and editing. Your active site is visible to anyone that may come across your URL.
You now finally have your site complete – congrats!
So you still may be thinking to yourself, “Should I use BoldGrid?”
Other WordPress builder plugins
In its current stage, BoldGrid is more than just a website builder. This innovative tool, unlike many other website builders, comes with a variety of interactive themes and endless amounts of stock photos to choose from to create a gorgeous site.
If you were already planning on using a WordPress platform for your site, then the incorporation of site builder into WordPress makes creating a seamless and reliable website for you or your clients incredibly effortless.
One of the biggest differences between using a competitor site builder and this one is the simplicity of the process.
With this plugin, what you see is what you get and unlike many other website building tools, you actually own your BoldGrid created site.
Your site will look professional, appear great on any kind of device ranging from monitor to mobile, and any changes that you’d like to make later on will be easily done as well.
Finally, because of BoldGrid’s partnership with InMotion Hosting, you’ll have a 24/7-support team available to you for any problems or questions that may arise.
This fantastic combination between WordPress and InMotion Hosting means that creating your site will be easy and enjoyable, the appearance will be flawless and professional, and you’ll never be left in the dark with a serious problem or request.
Disclaimer: We may earn a small commission when you purchase a product or service we trust through our affiliate links that cost nothing to you. That way, you help the writing team add more content. Thanks.